Tuesday, September 22, 2009

How to Add SEO Meta Tags to Blogger

Using meta tags in your blog can boost the blog's search engine placement and bring in more traffic to your site. Meta tags are picked up by search engines like Google, Yahoo and MSN Bing and used to quickly analyze a blog's content. They use the meta tags to index your blog using SEO (Search Engine Optimized) keywords. So when people type these keywords into the search box, the engines pull up the websites that closely match these keywords.

There are free meta tag generators that will make the meta tag code for you, but its pretty easy to do it yourself. Before you begin, you will need to come up with the following:

A description of your blog that is about 50-75 characters. Don't cram your keywords into this section or your site will get booted off of the search engines. Just write a clear description of your blog's overall content.

For example here's mine: "Tips, tricks, tutorials and hacks for Blogger beginners."


10-12 keywords.
Keywords are the basic words that people use to look up stuff so try to think of what you would use if you were searching for information. If you're still not sure on what keywords to use, there are free apps out there that will suggest key words for you. One of the best is Google AdWords Keyword Tool. You type in a few words or phrases describing your blog and the generator will suggest keywords and show you their current ranking in Google searches.

Again, don't be tempted to include every keyword under the sun in your meta tag or you'll get yourself booted for being a spam site. Keep it simple and separate your keywords with commas.

Example:
"blogger, blogspot, tips, tricks, tutorials, how to, blogger tutorial"

Once you have the description and keywords, now its time to create the code. Open Notepad (TextEdit for Mac users) and type in the following:


Using Notepad is an important key here, if you use a different word processor or copy the code off of the web, you can get formatting code mixed in with your meta code. If you do copy the code or create it somewhere else, paste it into Notepad and save it. That will clear all of the gunk out of the code.


Replace the capitalized text with your blog's title, description, keywords and your name.


Next, enter your blog's Layout section in Dashboard. Click "Edit HTML." Find this line of code:


Copy and paste your meta code directly under this line. Save your template.
If you receive an error message and the template won't save, go back and make sure that you included all of the tag openers (<) and closers (>).


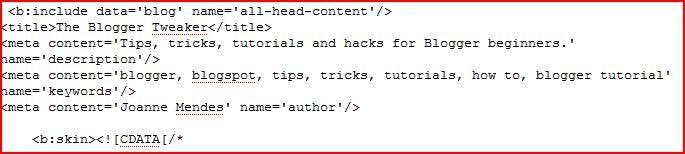
Here's what mine looks like:


Now it's time to make sure that your meta tags are properly phrased and working. There are free meta tag analyzers that will visit your site and give you a report on how your tags are working and suggest improvements. I use the SEOCentro Meta Tag Analyzer because you get back a very thorough report in seconds that lets you know what's working, what's not working and why. And its free, and free is always good.

Monday, September 21, 2009

How to Add Date to a Non-Blogger Template

If you upload a blog template from one of the many free template sites, often little tweaks occur; like losing the date and time stamp from your blog posts. This happened to me when I was updating the TWTA Newsletter and I searched all over the place for a fix. I found a couple of sites with complicated fixes involving HTML changes, which didn't work.

But I did learn that Blogger template creators design their templates to work with specific date and time stamp formatting. I went into the blog's settings, changed the date format and Booyah!, dates appeared on my posts. So before you start digging into the template HTML, try going into the Dashboard under Settings > Formatting and try different time stamp / date combinations. A simple fix for a simple problem.

Friday, May 15, 2009

How to Add a Tag Cloud

There are a lot of tutorials out there explaining how to add a tag cloud to your Blogger page. Some of them are kind of complicated but this is one of the easiest tutorials I found: Frivolous Motion.

A couple of points I'd like to add:
  1. Use the "Find" feature in your browser to find the location in the template HTML; it will make your life so much easier. You can find the search feature under the "Edit" tab in your browser window.
  2. The directions call for inserting the copied code above the line: b:widget id='Label1' locked='false' title='Labels' type='Label'/. This doesn't work and will create an error message. Paste the code over the line and replace it instead.
  3. Add a title to your cloud by inserting the name between: b:includable id='main'
    and
    b:if cond='data:title != ""' within the tag cloud code.
  4. Remember that if your change your Blogger template, you'll lose your tag cloud.

Friday, February 13, 2009

Share This: Social Bookmarking Widget for Blogger

A few months ago I experimented with social bookmarking using some articles I had posted on Associated Content. I wanted to see if social bookmarking actually increased page views since AC pays per view. So I randomly selected about a quarter of my articles and submitted them to Share This. After about 6 months, the bookmarked articles received hundreds of more page views than the un-bookmarked pieces. That's all I needed to see, now I bookmark not only my stuff but anybody's stuff that has the link.

Share This has a bookmarking widget for Blogger that is really easy to use. You create the bookmark using the wizard and they'll upload it to your blog layout and it automatically links to the individual blog posts. It doesn't get any easier than that.

Get yours at the Share This website. You'll have to create an account if you don't have one; it only takes a minute and its free. You can find the widget wizard under the Publishers tab, make sure that you have the Blogger option checked (its default setting is WordPress).

How to Hide the Blogger Navigational Bar

Hiding the Blogger navigational bar is a design decision based on the purpose of the blog. For instance, since this blog is about Blogger I don't really see the point in bothering to hide the bar. However on my other sites, Sysrender and TWTA Newsletter, I've hidden the bar because I feel it gives the sites a more professional look.

You can also remove the bar, but I've come across design issues with removing elements of the templates before, so I'm more comfortable just leaving it in as long as I don't have to look at it.

Under the Layout tab on your Dashboard and click the Edit HTML tab.

Scroll down a little bit past the header info until you get to the template info. This is how the template info looks on my Sysrender layout:

-----------------------------------------------
Blogger Template Style
Name: Minima
Designer: Douglas Bowman
URL: www.stopdesign.com
Date: 26 Feb 2004
Updated by: Blogger Team
----------------------------------------------- */

On the next line, type or cut and paste this line:

#navbar-iframe { display: none !important;}


Click Preview to make sure it works. Click Save Template to save the changes you made.

Wednesday, February 11, 2009

Adding Google Gadgets

About the Blogger Tweaker

I started blogging awhile ago but I moved over to Blogger from WordPress so I could utilize Google AdWords. After doing the boring stuff like transferring blog posts and stuff, I found that I was spending more and more time tweaking my blog,adding widgets and planning with the layout elements.

It was totally addicting. I soon became a full-blown Blogger tweaker, spending hours messing with my blog but not posting anything worthwhile. I don't know if there are any Blogger tweaker support groups, but there should be.

One thing I did do was compile the tweaks that I had worked out. I found on the Internet that a lot of the tweaker guides were for the older version of Blogger and didn't really work for the templates I was using. Fortunately, I'm taking some HTML classes so I've been able figure out some basic tweaks.

If you have any tips or tricks, let me know. If you have any questions, ask.